
What to Expect when Hiking Rucu Pichincha
- Jen Bloss
- Aug 27, 2023
- 6 min read
originally posted February 4, 2019
Like any spontaneous traveler, I did virtually no research on Ecuador before I decided to come here for a month of Spanish language school. I knew that Quito was at a high elevation, that the Galapagos and Amazon are here, and that they speak relatively slow, easy to understand Spanish. One of the most apparent things I’ve noticed since arrival is that there are a LOT of mountains here. Actually, most of those mountains are volcanoes- some dormant, some active. And, hiking is a big thing here (why did I opt to leave my hiking boots at home?). So, my first weekend in town I decided to tackle one spectacular hike that is located in the city of Quito itself- hiking to the top of the dormant volcano, Rucu Pichincha.
Rucu Pichincha is a fantastic hiking option if you are in Quito because it is easy to get to, it is challenging but not impossible, and provides you with some killer views of the city and surrounding mountains. And some parts of it are fun- really fun! It’s also a popular acclimatization hike for those wanting to climb higher mountains such as Cotopaxi, later in their trip. And that is because the summit is at 15,696 ft (4,784m)!
Want to know what to expect when hiking Rucu Pichincha? Check out the detailed notes below. Want the down and dirty, most important things to know before you go? Skip to the very bottom of the post!
STEP 1: TAKE THE TELEFERICO UP TO THE STARTING POINT.
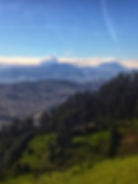
TTo start the Rucu Pichincha hike, you must first take the Teleferico. This is a cable car that transports you from the base in Quito (9,200 ft/ 2,850m elevation) up a mountain to the point of 13,451 ft /4,100 m. That's right, the hike starts at 13,451ft elevation. The views are stunning on a clear day- of Quito, of Cotopaxi, and the surrounding mountains. It costs $8.50 for foreigners to take the Teleferico, and prepare to wait in line for quite some time if you arrive long after it opens (and for your return journey). Once you reach the Teleferico station at the top, there is a cafe for last minute snacks/coffee/water, and bathrooms. Warning- the prices are high for bottles of water ($2 for 500 ml), so try to plan ahead and get them cheap in a grocery store beforehand. The starting point of the hike is a few meters past where the Teleferico lets off, and is easy to find.
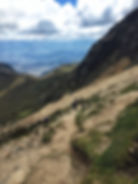
STEP 2: ENJOY A LEISURELY, SCENIC, BUT HEART POUNDING FIRST HOUR AND A HALF OF HIKING.
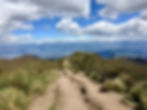
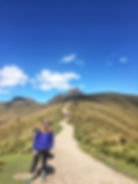
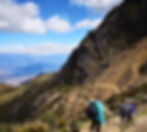
The first section of the trail is lovely. It is nicely packed dirt, well marked, and not steep. You get great views of the summit ahead of you, and of the green mountains all around. Yet, you’re still at a super high altitude, and all of the rolling hills feel much bigger than they are. I had to stop at the top of most inclines to catch my breath and allow my heart rate to come down.
STEP 3: GET READY FOR SOME ROCKS AND SAND
After the gentle incline you’ve been traversing, you encounter some single track trails and rocks. The rock scrambling is pretty fun, but watch your footing because some parts of the trail will have steep drop offs. And eventually you come to what looks like the biggest, steepest wall of sandy dirt that you have ever seen in your life. The thought of climbing up (or really, sliding backwards two steps for each step you take forward) is daunting. So don’t do that! There is small side trail just to the right of this massive sand wall, and it is packed dirt. Take that one. This is the steepest part of the trail you will actually walk, and it is tough!
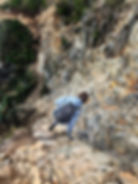
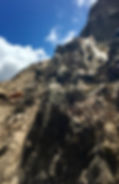
STEP 4: SERIOUS ROCK SCRAMBLING, SERIOUS FUN
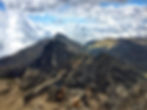
Once you’ve conquered that insane hill, you’re in the red zone. You can see the summit, and it is nothing but 20-30 minutes of vertical boulder climbing away! There is no “hiking” in this section, it is seriously pulling yourself up and over giant rocks. And it is awesome. It is basically an adult jungle gym that leaves you wondering how you will ever descend without falling to your death. There were two dogs climbing these rocks when I was, so it really isn’t that bad.
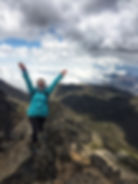
STEP 5: HIGH FIVE SOMEONE, YOU’VE MADE IT TO THE SUMMIT!
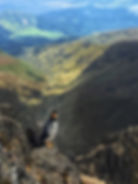
More or less three hours into your hike, you will reach the summit of Rucu Pichincha! At 15,596 ft, it is quite the accomplishment! It’s amazing that you can hike to such a crazy height in such little time. On a clear day, you can see all of Quito in the distance, and some breathtaking views of the other mountains all around you. When I was was there, I was above the clouds for a bit, and then they rolled in as a mist around the mountaintops. Worth every minute of the journey up. Thankfully, I didn’t experience any symptoms of altitude sickness- just some dizziness when I’d take a break after a strenuous section of hiking.
STEP 6: DESCEND CAREFULLY
One of my thoughts while on the summit was, “how will I get down?” Those cool rocks you climb up are a bit trickier to go down. But if you take your time and think about your hand and feet placement, it actually is no problem at all.
STEP 7: RUN, JUMP, AND SLIDE DOWN THE SAND
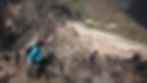
Remember that big sandy dirt wall? You don’t want to walk up it, but you certainly want to go down it. The dirt is fluffy and pretty deep, and despite the incline, you can actually run down it! This was probably the most fun part of the hike- it really makes you feel like a kid! My friends and I even debated walking back up so that we could do it again. Beware of some small rocks that are hidden within the fluff, and make sure to take your shoes off and shake the sand out afterwards.
Sand sliding down Rucu Pichincha
STEP 8: ENJOY AN EASY GRADUAL DECLINE BACK TO THE START.
At this point, all of the challenge is over and it is a purely delightful walk back to the Teleferico. This is when you start telling yourself that the hike was “easy” and you start making plans to tackle other, bigger mountains.
STEP 9: REFUEL IF NEEDED, AND HEAD BACK DOWN THE TELEFERICO
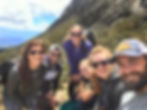
The slightly pricey shops in the Teleferico cafe now sound very appealing. I wanted everything after my hike- coffee, ice cream, water… but went with a moccachino. Again, get a snack and use the bathroom now because the line for Teleferico moves very slowly. My friends and I spent approximately one hour waiting to get in a cable car to return home!
THE MOST IMPORTANT THINGS TO KNOW BEFORE YOU HIKE RUCU PICHINCHA:
The altitude is no joke. You start the hike at 13,451 ft (4100m), and end at 15,696 ft (4784m). If you live at sea level and have recently arrived altitude, you should spend several days in Quito (9,350 ft/ 2850m) getting used to the change before the hike. Just because it is a popular hike, it doesn’t mean that the effects of altitude don’t exist. If you develop difficulty breathing, vomiting, vision problems, confusion, etc… turn around and descend immediately!
Start early. It took my group approximately 6 hours round trip, and that included at least 30 minutes enjoying the summit. Weather is unpredictable in Quito, and storms often roll in during the afternoon. Also, the line for the Teleferico can take a long time if you show up later in the day. Try to aim for the opening of the Teleferico- not only will you save time, you’ll also be around mostly hikers (and runners) with the same idea. This makes it easier to know that you’re on the right path.
Bring sunscreen, a hat, and layers. The sun is incredibly strong at high altitudes, and you will get seriously sunburned if you don’t use- and reapply- sunscreen. I actually got sunburned on the tiny piece of exposed skin between where my leggings ended and my socks began! A hat is useful for this reason as well. And please, bring layers! You may start off hot, but as you ascend the weather changes to colder and windy.
Bring lots of water, and snacks. I’d recommend a minimum of 2 liters of water, as the altitude will cause you to dehydrate faster for a myriad of reasons. Also, you’re going to need some energy along the way, so stash some snacks in your bag.
CONCERNS THAT TURNED OUT TO NOT BE CONCERNING:
The entire route seemed entirely safe, as far as thieves and threat of being robbed goes. In the past there have been apparently been some safety concerns about this hike. But if you go on a weekend, even alone, you will be joined by dozens of other friendly and supportive hikers.
Also due to there being many other hikers around, it’s hard to get lost. The trail is pretty well marked. But if a part of the trail doesn’t look well traveled, don’t go that way.
If you don’t have hiking boots, don’t fret. I did this hike in older running shoes, and they were adequate.
And there you have it! Next time you’re in Ecuador, definitely check out Rucu Pichincha. If you want to read more about staying active while traveling, check out my other posts on running in Bangladesh and abroad. And if you’re really adventurous, check out my Cotopaxi climb. Happy hiking my friends!